XRCed Component Plugins
Contents
This is a short guide on using new XRCed plugin framework to include support for XRC files with new or custom interface elements.
Note about XML resource handlers
Each XRC-loadable interface element must have a corresponding resource handler class registered with the corresponding XMLResource object (using AddHandler method). Handlers for the standard wxPython classes are registered automatically when you import xrc module. A component plugin for a non-standard class must register the resource handler explicitly, in order to be able to create a test view. Normally a custom resource handler class should be in a separate module accessible from PYTHONPATH. You can also put this module in the same directory as the component plugin module without using PYTHONPATH.
What are component plug-ins
A component plugin is defined using one of classes derived from Component base class (component module). First a component object must be constructed, then it is populated with data defining its behavior, and finally it must be registered with the plug-in framework using Manager.register(). Sometimes there are additional steps involved, such as modifying parentChildGroups dictionary to include new component groups, deriving special component classes, etc.
Python vs. manifest files
There are two ways to create component object:
- Using pure Python code, in a plug-in module imported by XRCed on start-up.
Using a CRX manifest file. The object is created from XML data, CRX files can be edited in XRCed using meta-component mode.
For simple interface elements the second method is probably easier to use, as it does not require knowing all the parameters for component class constructor and methods.
Example of a custom plug-in
Here's an example of defining a plug-in for gizmos.LEDNumberCtrl class. This is a LED-like interface element from contrib gizmos library included in wxWidgets and wrapped as gizmos wxPython module. First, we need a resource handler. Looking at the source code in src/gizmos/ledctrl.cpp, we can easily find out which window styles and constructor parameters are needed to create an object. The handler class should normally define two standard methods: CanHandle() and DoCreateResource(). We will include support for pos, size and value XRC attributes.
File: xh_ledctrl.py
import wx
import wx.xrc as xrc
import wx.gizmos as gizmos
class LEDNumberCtrlXmlHandler(xrc.XmlResourceHandler):
    def __init__(self):
        xrc.XmlResourceHandler.__init__(self)
        # Standard styles
        self.AddWindowStyles()
        # Custom styles
        self.AddStyle('wxLED_ALIGN_LEFT', gizmos.LED_ALIGN_LEFT)
        self.AddStyle('wxLED_ALIGN_RIGHT', gizmos.LED_ALIGN_RIGHT)
        self.AddStyle('wxLED_ALIGN_CENTER', gizmos.LED_ALIGN_CENTER)
        self.AddStyle('wxLED_DRAW_FADED', gizmos.LED_DRAW_FADED)
    def CanHandle(self,node):
        return self.IsOfClass(node, 'LEDNumberCtrl')
    # Process XML parameters and create the object
    def DoCreateResource(self):
        assert self.GetInstance() is None
        w = gizmos.LEDNumberCtrl(self.GetParentAsWindow(),
                                 self.GetID(),
                                 self.GetPosition(),
                                 self.GetSize(),
                                 self.GetStyle())
        w.SetValue(self.GetText('value'))
        self.SetupWindow(w)
        return w
Next step is defining a component plug-in class for using in XRCed. In this case we can use base Component class, which has all necessary functionality for control-like components and predefines standard window attributes and styles.
Python way
File: ledctrl.py
from xh_ledctrl import *
from component import *
# Construct a new component object, belonging to 'control' group
c = Component('LEDNumberCtrl', ['control'], ['pos', 'size', 'value'])
# Set custom window styles
c.addStyles('wxLED_ALIGN_LEFT', 'wxLED_ALIGN_RIGHT',
            'wxLED_ALIGN_CENTER', 'wxLED_ALIGN_FADED')
# Register
Manager.register(c)
# Put under 'gizmo' pop-up menu with order index 10
Manager.setMenu(c, 'gizmo', 'LED number', 'LED-like control', 10)
That's all! After putting the plug-in and the resource file in one of plug-in directories defined in XRCEDPATH you can create and test interfaces containing this control. Note that it can only be put inside a window object, because we specified 'control' group in the group list ctor parameter, which restricts the place in the XML tree where it can be put.
Visual way
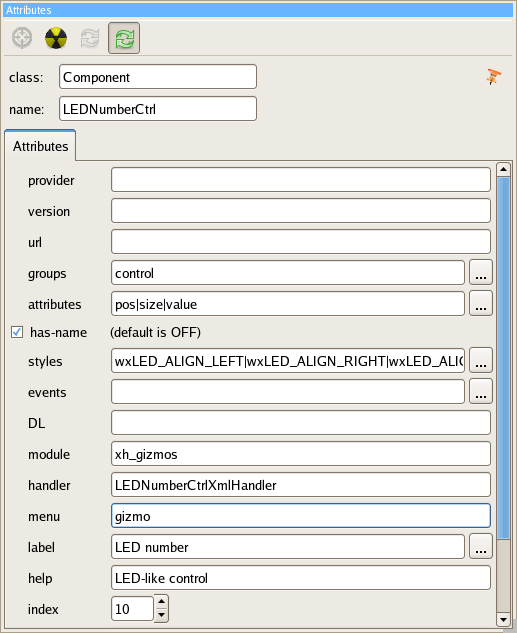
And now for something completely different! Start XRCed with --meta option, then open right-click tree pop-up menu, select "Append > component" and fill attribute panel as shown:

Then save the result under ledctrl.crx in a plug-in directory. After restarting XRCed (in normal mode) you should obtain the same result as with Python-coded plug-in.
Documentation and additional resources
http://xrced.sourceforge.net/api_doc/ - epydoc-generated HTML docs for XRCed classes related to component plugins
XRCed Refactoring Project; Plugin framework - some more details about plug-in component classes
Use the f^Hsource! Especially plugins/core.py and plugins/controls.py can be helpful, and probably component.py too.
