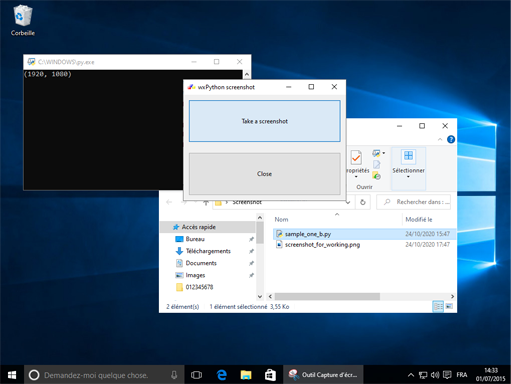
How to take a screen shot (Python)
Keywords : Screen, Screenshot, Selected area.
Contents
Demonstrating :
Tested py3.x, wx4.x and Win10.
Are you ready to use some samples ? ![]()
Test, modify, correct, complete, improve and share your discoveries ! ![]()
Screen shot with wxPython :
First example

   1 # sample_one_a.py
   2
   3 import wx
   4
   5 #-------------------------------------------------------------------------------
   6
   7 app = wx.App(False)
   8
   9 s = wx.ScreenDC()
  10 w, h = s.Size.Get()
  11 b = wx.Bitmap(w, h)
  12
  13 m = wx.MemoryDC(s)
  14 m.SelectObject(b)
  15 m.Blit(0, 0, w, h, s, 0, 0)
  16 m.SelectObject(wx.NullBitmap)
  17
  18 b.SaveFile("Screenshot.png", wx.BITMAP_TYPE_PNG)
Second example (Andrea Gavana)

   1 # sample_one_b.py
   2
   3 """
   4
   5 Author : Thank to Andrea Gavana.
   6 Link : https://stackoverflow.com/questions/58539333/how-to-take-screenshot-of-whole-screen-using-wxpython
   7
   8 """
   9
  10 import wx
  11
  12 #---------------------------------------------------------------------------
  13
  14 class MyFrame(wx.Frame):
  15     """
  16     ...
  17     """
  18     def __init__(self, *args, **kwargs):
  19         wx.Frame.__init__(self, *args, **kwargs)
  20
  21         #------------
  22
  23         # Simplified init method.
  24         self.SetProperties()
  25         self.CreateCtrls()
  26         self.BindEvents()
  27         self.DoLayout()
  28
  29         #------------
  30
  31         self.CenterOnScreen(wx.BOTH)
  32
  33     #-----------------------------------------------------------------------
  34
  35     def SetProperties(self):
  36         """
  37         ...
  38         """
  39
  40         self.SetSize((340, 250))
  41
  42         #------------
  43
  44         # Return icons folder.
  45         self.SetIcon(wx.Icon('./icons/wxwin.ico'))
  46
  47     #-----------------------------------------------------------------------
  48
  49     def CreateCtrls(self):
  50         """
  51         ...
  52         """
  53
  54         # Create a panel.
  55         self.panel = wx.Panel(self, -1)
  56
  57         #------------
  58
  59         # Add buttons.
  60         self.btnScreenshot = wx.Button(self.panel, - 1,
  61                                        "Take a screenshot")
  62
  63         self.btnClose = wx.Button(self.panel, -1,
  64                                   "&Close")
  65
  66
  67     def BindEvents(self):
  68         """
  69         Bind some events to an event handler.
  70         """
  71
  72         # Bind events to an events handler.
  73         self.Bind(wx.EVT_BUTTON, self.OnScreenshot, self.btnScreenshot)
  74         self.Bind(wx.EVT_BUTTON, self.OnCloseMe, self.btnClose)
  75         self.Bind(wx.EVT_CLOSE, self.OnCloseWindow)
  76
  77
  78     def DoLayout(self):
  79         """
  80         ...
  81         """
  82
  83         # MainSizer is the top-level one that manages everything.
  84         mainSizer = wx.BoxSizer(wx.VERTICAL)
  85
  86         # wx.BoxSizer(window, proportion, flag, border).
  87         # wx.BoxSizer(sizer, proportion, flag, border).
  88         mainSizer.Add(self.btnScreenshot, 1, wx.EXPAND | wx.ALL, 10)
  89         mainSizer.Add(self.btnClose, 1, wx.EXPAND | wx.ALL, 10)
  90
  91         # Finally, tell the panel to use the sizer for layout.
  92         self.panel.SetAutoLayout(True)
  93         self.panel.SetSizer(mainSizer)
  94
  95         mainSizer.Fit(self.panel)
  96
  97
  98     def OnScreenshot(self, event):
  99         """
 100         Thank to Andrea Gavana.
 101         """
 102
 103         screen = wx.ScreenDC()
 104         size = screen.GetSize()
 105
 106         # Debugging : see if pixel values are okay.
 107         print(wx.DisplaySize())
 108
 109         width = size[0]
 110         height = size[1]
 111
 112         # Compare with above values.
 113         print(width, height)
 114
 115         # Use Bitmap here instead of wx.Bitmap.
 116         bmp = wx.Bitmap(width, height)
 117         mem = wx.MemoryDC(bmp)
 118         # Tell mem to use the actual bitmap.
 119         mem.SelectObject(bmp)
 120         mem.Blit(0, 0, width, height, screen, 0, 0)
 121         del mem
 122         bmp.SaveFile('screenshot_for_working.png', wx.BITMAP_TYPE_PNG)
 123
 124
 125     def OnCloseMe(self, event):
 126         """
 127         ...
 128         """
 129
 130         self.Close(True)
 131
 132
 133     def OnCloseWindow(self, event):
 134         """
 135         ...
 136         """
 137
 138         self.Destroy()
 139
 140 #---------------------------------------------------------------------------
 141
 142 if __name__ == '__main__':
 143      app = wx.App()
 144      frame = MyFrame(None, title="wxPython screenshot")
 145      frame.Show(True)
 146      app.MainLoop()
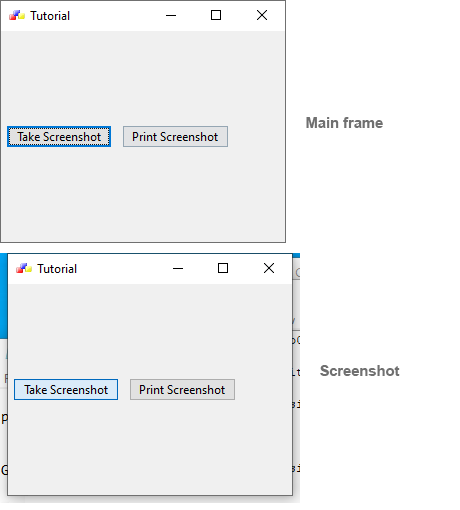
Third example (Mike driscoll)

   1 # sample_one_c.py
   2
   3 """
   4
   5 Author : Mike Driscoll
   6 Link : https://www.blog.pythonlibrary.org/2010/04/16/how-to-take-a-screenshot-of-your-wxpython-app-and-print-it/
   7
   8 """
   9
  10 import sys
  11 import wx
  12
  13 #---------------------------------------------------------------------------
  14
  15 class MyForm(wx.Frame):
  16     """
  17     ...
  18     """
  19     def __init__(self):
  20         wx.Frame.__init__(self, None, wx.ID_ANY, "Tutorial", size=(300, 250))
  21
  22         #------------
  23
  24         # Return icons folder.
  25         self.SetIcon(wx.Icon('./icons/wxwin.ico'))
  26
  27         #------------
  28
  29         # Add a panel so it looks the correct on all platforms
  30         panel = wx.Panel(self, wx.ID_ANY)
  31         screenshotBtn = wx.Button(panel, wx.ID_ANY, "Take Screenshot")
  32         screenshotBtn.Bind(wx.EVT_BUTTON, self.OnTakeScreenShot)
  33
  34         #------------
  35
  36         sizer = wx.BoxSizer(wx.HORIZONTAL)
  37         sizer.Add(screenshotBtn, 0, wx.ALL|wx.CENTER, 5)
  38         panel.SetSizer(sizer)
  39
  40     #-----------------------------------------------------------------------
  41
  42     def OnTakeScreenShot(self, event):
  43         """
  44         Takes a screenshot of the screen at give pos & size (rect).
  45         """
  46
  47         print('Taking screenshot...')
  48
  49         rect = self.GetRect()
  50         # See http://aspn.activestate.com/ASPN/Mail/Message/wxpython-users/3575899
  51         # Created by Andrea Gavana.
  52
  53         # Adjust widths for Linux (figured out by John Torres.
  54         # http://article.gmane.org/gmane.comp.python.wxpython/67327)
  55         if sys.platform == 'linux2':
  56             # client_x, client_y = self.ClientToScreen((0, 0))
  57             client_x, client_y = self.ClientToScreen((0, 0))
  58             border_width = client_x - rect.x
  59             title_bar_height = client_y - rect.y
  60             rect.width += (border_width * 2)
  61             rect.height += title_bar_height + border_width
  62
  63         # Create a DC for the whole screen area.
  64         dcScreen = wx.ScreenDC()
  65
  66         # Create a Bitmap that will hold the screenshot image later on.
  67         # Note that the Bitmap must have a size big enough to hold the screenshot
  68         # -1 means using the current default colour depth.
  69         bmp = wx.Bitmap(rect.width, rect.height)
  70
  71         # Create a memory DC that will be used for actually taking the screenshot.
  72         memDC = wx.MemoryDC()
  73
  74         # Tell the memory DC to use our Bitmap
  75         # all drawing action on the memory DC will go to the Bitmap now.
  76         memDC.SelectObject(bmp)
  77
  78         # Blit (in this case copy) the actual screen on the memory DC
  79         # and thus the Bitmap.
  80         memDC.Blit( 0, # Copy to this X coordinate.
  81                     0, # Copy to this Y coordinate.
  82                     rect.width, # Copy this width.
  83                     rect.height, # Copy this height.
  84                     dcScreen, # From where do we copy ?
  85                     rect.x, # What's the X offset in the original DC ?
  86                     rect.y  # What's the Y offset in the original DC ?
  87                     )
  88
  89         # Select the Bitmap out of the memory DC by selecting a new
  90         # uninitialized Bitmap.
  91         memDC.SelectObject(wx.NullBitmap)
  92
  93         img = bmp.ConvertToImage()
  94         fileName = "MyScreenshot.png"
  95         img.SaveFile(fileName, wx.BITMAP_TYPE_PNG)
  96         print('...saving as png!')
  97
  98 #---------------------------------------------------------------------------
  99
 100 # Run the program.
 101 if __name__ == "__main__":
 102     app = wx.App(False)
 103     frame = MyForm()
 104     frame.Show()
 105     app.MainLoop()
QQ-screenshot (醉仙灵芙 / CorttChan) :
First example
Link :
https://github.com/guzhenping/QQ-screenshot-made-by-wxPython/blob/master/CopyScreen.pyw
https://github.com/guzhenping/QQ-screenshot-made-by-wxPython
https://github.com/guzhenping/
Screen shot with Python :
Pyscreenshot :
First example
Grab and show the whole screen.
You must install this package for use it :
pip install pyscreenshot
Second example
Link :
https://pypi.org/project/pyscreenshot/
https://github.com/ponty/pyscreenshot
PyAutoGUI :
First example
You must install this package for use it :
pip install PyAutoGUI
Link :
https://pypi.org/project/PyAutoGUI/
https://pyautogui.readthedocs.io/en/latest/
https://datatofish.com/screenshot-python/
Mss :
First example
You must install this package for use it :
pip install mss
Link :
Screenshot (Alex DeLorenzo) :
First example
Better macOS screenshots via the Terminal.
You must install this package for use it :
pip install screenshot
Link :
https://pypi.org/project/screenshot/
https://github.com/alexdelorenzo/screenshot
Additional Information
Link :
- - - - -
https://wiki.wxpython.org/TitleIndex
Thanks to
The wxPython community...
About this page
Date(d/m/y) Person (bot) Comments :
24/10/20 - Ecco (Created page for wxPython Phoenix).
Comments
- blah, blah, blah....
